Written by The PawCalmHub Team. Reviewed for alignment with Fear Free veterinary guidelines and current veterinary behavioral research. Last updated 2025.
Here is a fact that should change how every cat owner thinks about veterinary care:
Research from the American Association of Feline Practitioners found that 38% of cat owners report feeling stressed just thinking about taking their cat to the vet. And that among cats who do not receive adequate veterinary care, the most common owner-reported reason is that the cat “hates the vet” and the experience is too distressing for everyone involved.
This is a genuine public health problem. Cats are missing critical preventive care because the experience of getting them there is too traumatic — for the cat, for the owner, and for the veterinary team.
It does not have to be this way. This guide gives you the complete protocol used by Fear Free certified veterinary professionals to transform vet visits from traumatic to tolerable — and for many cats, genuinely manageable.
Why Vet Visits Are So Stressful for Cats
Understanding the specific stressors helps you target interventions precisely:
The carrier: For most cats, the carrier only appears before veterinary or travel events. It has therefore acquired a strong negative predictive association — carrier = something unpleasant is about to happen.
The car: Unfamiliar motion, unfamiliar sounds, exhaust smells, and historical association with stressful destinations.
The clinic waiting room: The smells of other animals (particularly dogs), unfamiliar human smells, unfamiliar sounds, and the absence of any territory markers that signal safety.
The examination: Being placed on a cold metal surface, restrained by unfamiliar hands, touched in sensitive areas, temperature taken rectally, blood drawn. Even in the gentlest clinic, this is an objectively overwhelming sensory experience for a prey animal with a hypervigilant nervous system.
Residual stress: Cats who have had distressing vet visits retain those emotional memories and show anticipatory anxiety before subsequent visits — making each successive visit more challenging than the last.
Understanding each of these stressors allows you to intervene at every stage rather than just trying to manage the visit itself.
Your Pre-Vet Visit Protocol Checklist
Print this and keep it with your cat’s carrier.
╔══════════════════════════════════════════════════════╗
║ PAWCALMHUB PRE-VET VISIT PROTOCOL — CATS ║
╠══════════════════════════════════════════════════════╣
║ ║
║ ONE WEEK BEFORE ║
║ □ Begin daily Zylkene supplementation ║
║ □ Introduce carrier with open door in living area ║
║ □ Start feeding meals near/inside carrier ║
║ ║
║ DAY BEFORE ║
║ □ Prepare and freeze lick mat recipe ║
║ □ Spray carrier interior with Feliway Classic ║
║ (allow 30 min for alcohol to evaporate) ║
║ □ Place worn clothing inside carrier ║
║ □ Give Zylkene with evening meal ║
║ ║
║ MORNING OF APPOINTMENT ║
║ □ Give Zylkene with breakfast ║
║ □ Re-spray carrier if needed (30 min before use) ║
║ □ Keep home environment calm — no rushing ║
║ □ Do not force cat into carrier ║
║ ║
║ AT THE CLINIC ║
║ □ Cover carrier with light blanket ║
║ □ Request cat-only waiting area if available ║
║ □ Deploy frozen lick mat on exam table ║
║ □ Ask vet to allow carrier-top removal ║
║ rather than removing cat from carrier ║
║ ║
║ RETURNING HOME (multi-cat households) ║
║ □ Separate returning cat for 1–2 hours ║
║ □ Spray reunion area with Feliway before ║
║ reintroduction ║
║ □ Offer lick mat session to returning cat ║
║ ║
╚══════════════════════════════════════════════════════╝
PawCalmHub.com · hello@pawcalmhub.com
Stage 1: Carrier Training (Start This Week)
The single most impactful thing you can do for your cat’s vet experience requires no vet visit at all. It starts at home, months before your next appointment.
Phase 1 — The carrier is furniture: Remove the carrier door and place the carrier in a room your cat uses regularly. Put a soft, familiar-smelling blanket inside. Do not force anything. Let your cat investigate on their own terms. Feed treats near the carrier entrance daily.
Phase 2 — The carrier is a dining room: Begin feeding your cat’s regular meals just inside the carrier entrance. Over days, move the food bowl progressively further inside.
Phase 3 — The carrier is a nap spot: Once your cat is comfortable eating fully inside the carrier, replace the food bowl with a nap-friendly bed. Add a worn piece of your clothing. Many cats begin using it voluntarily for sleep.
Phase 4 — Closed carrier practice: Gently close the carrier door while your cat is relaxed inside. Immediately open. Gradually extend duration. The goal is a cat who enters and rests in a closed carrier without distress.
Phase 5 — Movement practice: Carry the closed carrier briefly around your home. Then briefly to your car (parked). Progress to a brief drive around the block ending at home. Never to the vet until all earlier phases are completely calm.
This process takes 4–12 weeks depending on your cat’s starting anxiety level. A cat who completes this protocol arrives at veterinary appointments in a carrier that is their safe, familiar space — not a stress-triggering confinement.
Stage 2: Pheromone Preparation
Spray the inside of the carrier with Feliway Classic spray at least 30 minutes before any trip — allowing time for the alcohol carrier to evaporate before your cat enters. Feliway reduces the clinic environment’s unfamiliarity by providing a familiar chemical signal inside the carrier throughout the journey.
If you have a Feliway diffuser running at home, your cat’s baseline pheromone exposure is already elevated — which reduces the contrast between home and clinic environments.
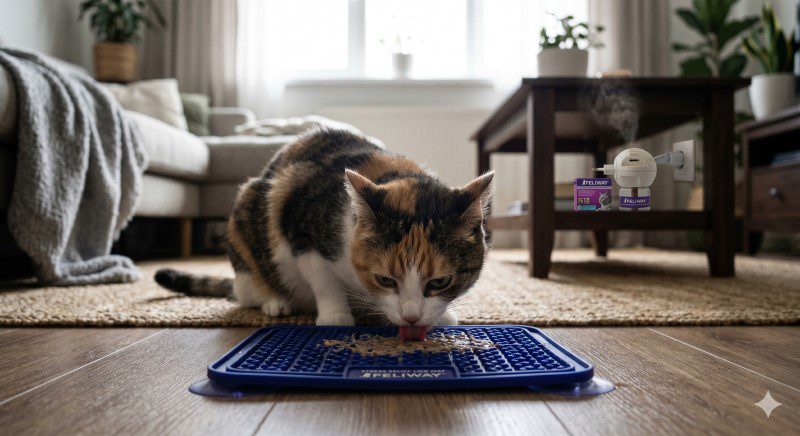
Stage 3: The Lick Mat Protocol
A lick mat is the single most effective in-visit tool for reducing cat examination stress.
Before: Spread with wet cat food, plain meat baby food, or tuna water. Freeze if time allows.
During: Place the lick mat on the examination table before your cat is removed from the carrier. Allow them to go directly to the lick mat on their own terms before the vet approaches.
The licking response:
- Releases endorphins within 60 seconds
- Occupies the cat’s sensory attention circuits
- Reduces active cortisol output
- Provides a familiar positive experience in an unfamiliar environment
Fear Free certified veterinary professionals use this technique as standard practice. Many clinics will allow you to bring your own lick mat if they do not have one available.
Ask your vet in advance: “Would it be okay if I bring a lick mat for my cat during the examination?” In a Fear Free-aligned practice, this will be enthusiastically welcomed.
Lick Mat Recipes for Extended Vet Visit Engagement
The difference between a lick mat that keeps your cat occupied for 5 minutes and one that lasts through an entire examination is almost entirely about what you put on it.
For blood draw or injection appointments (need maximum engagement — 15+ minutes):
- Layer 1 (base): Thin spread of plain cream cheese
- Layer 2 (middle): Small amount of tuna in water pressed into the texture zones
- Layer 3 (top): Thin layer of plain meat baby food (chicken or turkey, no garlic or onion)
- Freeze overnight: extends engagement to 20–30 minutes
For routine examinations (8–12 minutes):
- Plain wet cat food spread generously across all texture zones
- Freeze for 1 hour minimum before appointment
For highly anxious cats (maximum calming effect):
- Plain meat baby food (Gerber Stage 1 — chicken or turkey only, verify no onion or garlic)
- Freeze completely solid overnight
- This is the combination Fear Free certified veterinary professionals most commonly recommend for in-clinic use
Important: Introduce the lick mat at home with these specific recipes several times before the vet appointment. The familiar taste and texture in the clinic environment activates the calming association built at home.
Stage 4: Calming Supplements Before the Appointment
For cats with significant vet anxiety, daily calming supplements for 5–7 days before an appointment can meaningfully lower baseline anxiety and make the examination more manageable.
Zylkene (hydrolyzed milk protein) and L-theanine are the best-evidenced options for this purpose. Give with the morning meal — allow 30–60 minutes for onset before morning travel.
For cats with severe vet anxiety, ask your veterinarian about a short-term anti-anxiety medication (gabapentin is commonly prescribed for pre-veterinary use in cats) that can be given the night before and morning of the appointment. This is a growing and well-supported practice in Fear Free veterinary care.
Stage 5: The Clinic Environment — What to Look For
Not all veterinary clinics are created equal for anxious cats. Look for these signs that your clinic understands cat anxiety:
Separate waiting areas for dogs and cats — or the ability to take your cat directly to an examination room rather than waiting in a shared space with dogs.
Covered carriers welcomed or encouraged — covering your carrier with a light blanket reduces visual stimulation and makes the environment feel more enclosed and den-like.
Cat-only examination rooms — rooms where dogs are not seen ideally lack the stress-inducing dog smell that can be overwhelming to a cat’s chemosensory system.
Fear Free certification — the Fear Free program trains veterinary professionals specifically in low-stress handling techniques for cats and dogs. Finding a Fear Free certified clinic is one of the most impactful things you can do for a highly anxious cat.
Willingness to allow cat-led approach — a Fear Free aligned veterinarian will allow the cat to exit the carrier on their own terms rather than tipping the carrier to dump them onto the examination table.
During the Examination: What You Can Do
Stay calm yourself. Your cortisol is detectable to your cat. If you are visibly anxious about the examination, your cat reads that anxiety as confirmation that something threatening is happening.
Speak quietly and consistently. A soft, steady voice narrating what is happening (“good girl, the doctor is checking your ears now”) provides familiar stimulus in an unfamiliar environment.
Request the carrier top to be removed rather than the cat removed. Many veterinarians are willing to examine a cat while they remain in the bottom half of a hard-sided carrier, rather than removing them entirely. This is significantly less stressful for most cats.
Bring familiar scent. A small piece of your worn clothing placed in the carrier, or on the examination table, provides olfactory anchoring.
Advocate for your cat. If your cat is showing clear distress signals — flattened ears, attempting to flee, hissing, trembling — you are permitted to ask the vet to pause and give your cat a moment. A reputable vet will agree. A rushed examination on a panicking cat produces worse health outcomes anyway.
After the Appointment: Recovery
The residual cortisol from a stressful vet visit can affect your cat’s behavior for hours — sometimes days — afterward. In multi-cat households, returning cats frequently experience non-recognition aggression — the resident cat smells clinic smells and treats the returning cat as an intruder.
Management:
- Keep the returning cat separated from resident cats for 1–2 hours
- Rub a shared blanket over both cats before reuniting to equalize scents
- Feliway spray in the reunion area before reintroduction
- Provide a high-value lick mat session for the returning cat during isolation — the endorphin release accelerates cortisol recovery
How to Find a Fear Free Certified Clinic Near You
Fear Free certification indicates a veterinary practice has completed specific training in low-stress handling for cats and dogs. In a Fear Free clinic you can expect separate cat and dog waiting areas, cat-only examination rooms, towel wraps instead of full restraint, and enthusiastic support for your lick mat protocol.
Find a Fear Free certified professional in your area at the official Fear Free directory: fearfreepets.com/find-a-professional
When calling a new clinic for the first time, ask these three questions:
- “Do you have a separate waiting area for cats?”
- “Are your staff Fear Free certified or trained in low-stress handling?”
- “Am I able to bring a lick mat for my cat’s examination?”
A clinic that answers yes to all three is a clinic that understands cat anxiety. These exist in every major US c
How do I get my cat into the carrier without a struggle?
Complete the carrier training protocol above — starting at home weeks before any appointment. A cat who has learned the carrier is a safe, familiar space enters it willingly. Chasing and forcing a cat into a carrier once is a choice that makes every subsequent carrier experience harder.
Can I sedate my cat for vet visits?
Pre-visit gabapentin (prescribed by your vet) is a well-supported option for highly anxious cats and is not the same as sedation — it reduces anxiety while allowing the cat to remain responsive. Discuss with your vet whether this is appropriate for your cat.
My vet is not Fear Free certified. What can I still do?
Bring your own lick mat. Request a carrier-top removal rather than full cat removal. Ask to wait in a separate area from dogs. Come with a prepared carrier that smells of home. These modifications are possible in any clinic.
How long does it take cats to recover from a vet visit?
Most cats return to baseline within 2–6 hours of returning home. Highly anxious cats in multi-cat households may take 24–48 hours. Consistent positive vet visit conditioning over time shortens recovery significantly.
Should I find a cat-only veterinary clinic?
For cats with significant veterinary anxiety, a cat-only clinic removes the dog-smell element of clinic stress — which is significant. If one is available in your area and within your budget, it is worth the switch.
Non-slip base · Machine washable · Free US shipping
About the Author The PawCalmHub Team — researched and written with alignment to Fear Free veterinary guidelines and current behavioral research. hello@pawcalmhub.com